
It doesn't take a $500 camera to shoot good pictures. It takes practice -- developing an eye for composition, lighting, storytelling. (This post BEST viewed on a PC, ipad or smartphone TURNED-SIDEWAYS)

Even back in 1941, a crude box brownie camera took these incredible pictures at Pearl Harbor. Look how well composed these are!

Amateur photographers can get great pictures, with a decent camera -- or even a SMART PHONE. Artistic pictures. Keepers. Here's how:
Know your equipment, read the manual, and practice.
- Assess the situation --especially for good lighting.
- Hold your camera steady. Wait for the good shots!
- Don't tire out your 'victims' with too many photos.
- Use your Zoom so you don't have to get in their faces.
- But DO get in their faces if its the only way to get the shot!!
Be brave, get in CLOSE
Without ZOOM capability, shoot CLOSER to your subject to fill your viewfinder. Get as close as you can to reduce unwanted sky, empty rooms, tiny stickfigures. You want action, detailed faces, but far enough away you can see where your subject actually is.
Without being rude, get in the WAY -- don't be bashful. Yes, get your shot near down front of the stage, but THEN get outta the way.

 The only rule is don't interrupt ceremonies like weddings or funerals. If you must get closer, do it from the side so not to block an audience's view. Best yet, buy a better camera with a tele-photo zoom lens!
Fuzzy focus. Get em focused before you shoot!
 Many cameras have "auto-focus" to automatically focus for you, usually by setting their lense focus for 2 full seconds to the center part of the picture you're about to shoot. They figure THAT's what you want sharpest. Faces and eyes - not background trees on the sides!
 Most people would rather see less posing and more candid...natural expressions of people doing things--playing sports, petting the dog, cooking, working on the car. Mom's holding the babies while they look at each other.
Don't shoot just one! You'll learn how to shoot well if you read the instructions to your camera and practice. And shoot several slightly different photos so your subjects give you various facial expressions to choose from! Luckily, we don't have to pay for film processing anymore so you can experiment with lots of settings, and several shots. Don't buy a camera the day of the wedding or borrow somebody elses. Buy it a month before and take lots of practice shots! You'll be happier with your improved skills!
Set your camera beforehand to create the highest resolution photos
You want the best image detail for enlarging and sharpness--even if they create large files. You can always compress or reduce file sizes for copies to email; just keep the original, bigger ones.

On the internet, some photos are large others are small. Given a choice, download the bigger ones!
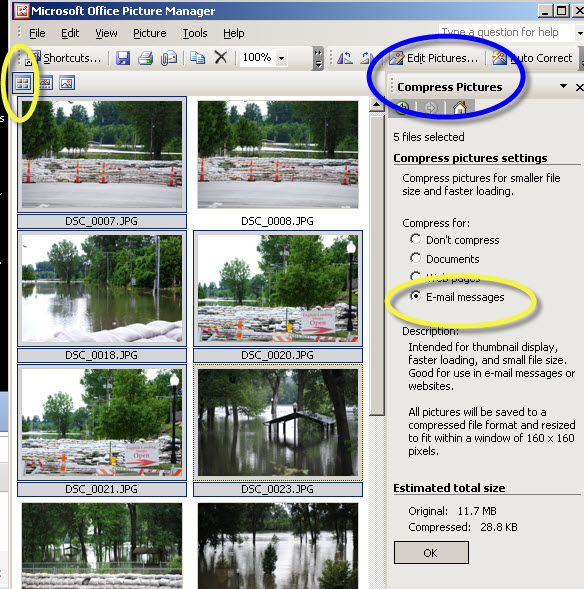
Modern cameras like iPhones save pictures at a larger quality and size. But they're often too big to EMAIL so you may have to copy and reduce their size and quality. Some software will compress them for faster emailing. Learn how to do that with your software or get software that does this task more easily. (Example on the left is Office's Picture Manager. Below is MS Photo by just clicking to open the picture on Windows 10.)

Important: Crop, sharpen and fix lighting contrast afterwards in Windows' photo editor.
Use your skills to shoot the best possible pictures as you shoot them. Then back home, you can usually tweek all your best ones before you print or email them.
Many cameras have "auto-focus" to automatically focus for you, usually by setting their lense focus for 2 full seconds to the center part of the picture you're about to shoot. They figure THAT's what you want sharpest. Faces and eyes - not background trees on the sides! - HALF-click the shutter to get your camera to focus for 2 seconds it needs in the middle of your shot.
- Steady up and THEN finish your click!
What do you want your picture to show?
If your child is on stage dancing, you want YOUR kid in the center of the picture. Get down near front and shoot lots of photos--not all the same. Eyes should focus into the picture, not looking outward to the edges. Show the whole action if it tells a story, as close as you can but don't cut out the important parts.
Posed or candid shot? It's much better to take candid or action shots and that's not always easy. Finish this and then go back to check this article on capturing action.

There's a time to smile and pose in a lineup for the camera--not bad for shots with grandma and the grand kids. But that only shows what they looked like. Do faces, not long dresses! This one tells a story. See how we included ALL the puppies? That's what the photo is about--mama dog and pups.
 Most people would rather see less posing and more candid...natural expressions of people doing things--playing sports, petting the dog, cooking, working on the car. Mom's holding the babies while they look at each other.
Dancing! People having fun. Those kind of candid shots are best done with a better camera that has a zoom lense... so you can shoot them at a bit of a distance when they're not aware of you and your camera. And you have to shoot lots of attempts because timing is everything. Don't cut off heads! You can refine the framing precisely later with a picture editor.
Fast shutter speeds give best, sharp action. If you have a high quality camera, shoot sports or other fast movement with your shutter set to 'fast' (a 30th to 1,000th of a second) so they don't blur during fast movements. If you don't have a manual-shutter camera, just hope for the best. And hold your camera steady! For landscape photography, buy a sturdy tripod so your camera will be rock-steady and sharp when you shoot it. Shoot several attempts.

Take the time to arrange it for best lighting. Turn em around. Move yourself to where the light on your subjects is best! Yup, get on the other side. Look for best lighting when you evaluate the room or the sun when outdoors, as you're about to take pictures. (Only here did we break that rule to make an affect of half-lighting this face.)
Try not to shoot subjects facing the brightest sun, or they'll squint their eyes--shoot in bright shade or slightly cloudy if you can.
Fast shutter speeds give best, sharp action. If you have a high quality camera, shoot sports or other fast movement with your shutter set to 'fast' (a 30th to 1,000th of a second) so they don't blur during fast movements. If you don't have a manual-shutter camera, just hope for the best. And hold your camera steady! For landscape photography, buy a sturdy tripod so your camera will be rock-steady and sharp when you shoot it. Shoot several attempts.
Lighting is VERY important
Make sure you use good natural light since you don't have a photo-flash. Move yourself to place yourself with the SUN or light source behind you, lighting up their faces. Never have the light BEHIND them.
Take the time to arrange it for best lighting. Turn em around. Move yourself to where the light on your subjects is best! Yup, get on the other side. Look for best lighting when you evaluate the room or the sun when outdoors, as you're about to take pictures. (Only here did we break that rule to make an affect of half-lighting this face.)
Try not to shoot subjects facing the brightest sun, or they'll squint their eyes--shoot in bright shade or slightly cloudy if you can.
Getting creative. You can also be very creative with lighting and composition...look at these pictures to see what photographers have done by manipulating lighting or placing their subjects in an interesting surrounding--all to set a certain mood:

What tells a story? Sometimes we balance an interesting front porch with the details of a faces of women standing in front of it, or a vintage old car or tractor, or a church front. While this photo was centered on the women by the photographer of the day, we crop it differently to also show the ornate farmhouse because it adds character and context, while still showing enough detail of the women's faces when they were young.
 Using sharp and fuzzy focusing for effect.
Since you can't repair an out-of-focus picture with fuzzy edges, make sure you shoot it right the first time! Or shoot multiple shots; this is important if your camera makes you manually focus the lens. (To show you how a picture isn't ALL in focus, look at this one. Most of the picture is out-of-focus but the photographer deliberately focused on the foreground water puddle. See how sharp that part is, compared to the rest of the picture?) Practice for creative effects if you want faces sharp and background a bit out of focus!
Don't shoot just one! You'll learn how to shoot well if you read the instructions to your camera and practice. And shoot several slightly different photos so your subjects give you various facial expressions to choose from! Luckily, we don't have to pay for film processing anymore so you can experiment with lots of settings, and several shots. Don't buy a camera the day of the wedding or borrow somebody elses. Buy it a month before and take lots of practice shots! You'll be happier with your improved skills!
Set your camera beforehand to create the highest resolution photos
You want the best image detail for enlarging and sharpness--even if they create large files. You can always compress or reduce file sizes for copies to email; just keep the original, bigger ones.
On the internet, some photos are large others are small. Given a choice, download the bigger ones!
Modern cameras like iPhones save pictures at a larger quality and size. But they're often too big to EMAIL so you may have to copy and reduce their size and quality. Some software will compress them for faster emailing. Learn how to do that with your software or get software that does this task more easily. (Example on the left is Office's Picture Manager. Below is MS Photo by just clicking to open the picture on Windows 10.)

Important: Crop, sharpen and fix lighting contrast afterwards in Windows' photo editor.
Use your skills to shoot the best possible pictures as you shoot them. Then back home, you can usually tweek all your best ones before you print or email them.
Windows Confusion. Microsoft stupidly didn't name its built-in photo editing software anything...but the screen labels it "Photo" and that's the one that we'll discuss here because it's free in Windows 10 and normally opens by just double-clicking each picture. Then just press "edit." to crop or enhance the image. Different Windows versions may have a different photo-editor but they all do the same things.
 "Windows Photo Viewer" (not the same as the built-in, nameless "Photo") doesn't "EDIT" photos. It does let you view or compress pictures for easy Emailing. You may already have it and you can make it your default viewer if you don't ever edit photos but just look at them, and email them. DO YOU HAVE "Windows Photo Viewer" on Windows 10? Here's how to find out and set Windows 10 to display it.
IPHONE's HEIC format to PC's JPG photo format
IPHONE's HEIC format to PC's JPG photo format
Switching your IPHONE to shoot photos in JPG format instead of Apple's HEIC format. JPG works best when saving pictures on PC's Read more.
Click here to see how to tweek or rescue a troubled image with Windows free photo-editing software. You can crop out wasted parts, lighten or darken them. Even sharpen or soften edges and facial wrinkles.

 Back to Shooting Better Pictures
Click here to see how to tweek or rescue a troubled image with Windows free photo-editing software. You can crop out wasted parts, lighten or darken them. Even sharpen or soften edges and facial wrinkles.